

Red Velvet Cake Pops Recipe tastes like a bite of rich cocoa cake wrapped in creamy tangy frosting and dipped in a crisp chocolate shell, all on a cute little stick. It works for anyone who wants bakery-style cake pops at home in about 1 hour 30 minutes total, including chill time. I still remember the first time I brought these to a potluck and watched grown adults argue over the last one like it was the final rose on a reality show.
Why Make This Red Velvet Cake Pops Recipe at Home
Homemade red velvet cake pops cost a fraction of the coffee shop version and taste fresher. You control the sweetness, the coating, and the decorations, so every batch fits your crowd and your cravings.
You also skip mystery ingredients and use brands you already like. Kids love to help roll the balls and dip them, and adults secretly love that part too.
“These red velvet cake pops taste like they came from a fancy bakery, only better, because they actually taste like real cake.”
Ingredients You Need
the red velvet cake base
You can use a boxed mix or a from-scratch cake. I usually use a boxed red velvet cake mix on busy days and a scratch recipe when I want to flex.
- 1 box red velvet cake mix, plus ingredients listed on the box
- Use any brand you like; I often use Duncan Hines or Betty Crocker.
- If you prefer scratch, bake a single 9×13 pan of your favorite red velvet cake and cool it completely.
- Neutral oil, eggs, and water as directed on the cake mix box
Bake the cake in a 9×13 pan and cool it fully before you crumble it. Warm cake turns to mushy paste, and that makes sad cake pops.
the frosting binder
You only need a little frosting to bind the crumbs. Too much frosting gives you gummy cake pops.
- 1/3 to 1/2 cup cream cheese frosting
- Store-bought frosting works fine; I often use Pillsbury or store brand.
- You can use homemade cream cheese frosting if you already have some.
- In a pinch, vanilla frosting works, but cream cheese frosting gives better tang.
Start with 1/3 cup frosting, then add more by the tablespoon until the mixture holds together like play dough.
the coating
The coating gives that crisp shell and seals in moisture. Candy melts make this easy and consistent.
- 12 to 16 ounces red candy melts, white candy melts, or vanilla almond bark
- I like Wilton or Ghirardelli melting wafers because they melt smoothly.
- White chocolate chips tend to seize more easily, so add 1 teaspoon coconut oil if you use them.
- 1 to 2 teaspoons refined coconut oil or vegetable shortening
- This thins the coating so it coats smoothly.
- Skip butter; it softens too much at room temperature.
decoration
You can keep it simple or go full birthday-party-level extra.
- Sprinkles in red, white, or Valentine colors
- Crumbled red velvet cake crumbs (from trimming edges)
- Mini chocolate chips
- Drizzled contrasting candy melt (white drizzle on red looks great)
assembly
- 30 to 40 lollipop sticks (6 inch size works best)
- Styrofoam block, cake pop stand, or an upside-down egg carton with holes poked in it
Equipment list
- 9×13 baking pan
- Mixing bowls
- Hand mixer or stand mixer (optional but helpful)
- Baking sheet lined with parchment paper
- Small cookie scoop or tablespoon measure
- Microwave-safe bowl or double boiler for melting coating
- Fork or spoon for stirring coating
- Styrofoam block or stand for drying cake pops
Tips & Mistakes
- Roll cake balls to about 1 tablespoon size so they stay on the sticks and coat evenly.
- Chill the shaped cake balls at least 20 to 30 minutes so they feel firm before you dip them.
- Use only enough frosting to hold the crumbs together; stop when the mixture feels like soft clay, not sticky batter.
- Dip the tip of each stick in melted coating before you insert it into a cake ball so it acts like glue.
- Keep the coating warm and fluid; reheat in short bursts if it thickens.
- Avoid water near the coating; even a drop can cause it to seize and turn grainy.
- Work with a few cake pops at a time and keep the rest in the fridge so they stay firm.
- Do not swirl the cake pop in the coating; dip straight in and out, then gently tap and rotate to remove excess.
- If cracks form in the coating, the cake balls likely sat at room temperature too long before dipping; keep them chilled.
- If cake pops slide down the stick, you used too much frosting or made the balls too large; use less frosting next time and make smaller balls.
How to Make Red Velvet Cake Pops
Step 1: Bake and cool the cake
Prepare the red velvet cake mix according to the package directions. Pour the batter into a greased 9×13 pan and bake until a toothpick comes out clean. Let the cake cool completely on a wire rack, at least 1 hour.
If you rush this step, the warm cake will melt the frosting later and turn the mixture too soft. I often bake the cake the night before and wrap it once it cools.
Step 2: Crumble the cake
Cut off any very browned edges and set them aside for optional crumb garnish. Break the cooled cake into large chunks and place them in a large mixing bowl. Rub the cake between your fingers or use the mixer on low speed to crumble it into fine, even crumbs.
You want no big pieces or hard bits. The finer the crumbs, the smoother the cake pops.
Step 3: Mix with frosting
Add 1/3 cup cream cheese frosting to the cake crumbs. Use clean hands or a spatula to work the frosting into the crumbs until the mixture holds together when you squeeze it. Add more frosting 1 tablespoon at a time if the mixture feels too dry and crumbly.
Stop as soon as the mixture feels like soft modeling clay. If it feels sticky or greasy, you added too much frosting, so add a small handful of plain cake crumbs to balance it.
Step 4: Shape the cake balls
Line a baking sheet with parchment paper. Use a small cookie scoop or tablespoon to portion the mixture into even mounds. Roll each portion between your palms to form smooth, tight balls about 1 to 1.25 inches wide.
Place each ball on the lined baking sheet. Chill the tray in the fridge for 20 to 30 minutes until the balls feel firm to the touch.
Step 5: Melt the coating
Place the candy melts or almond bark in a microwave-safe bowl. Heat in 20 to 30 second bursts, stirring after each burst, until almost melted. Stir until completely smooth, then add 1 teaspoon coconut oil or shortening and stir again until glossy and fluid.
If the coating still feels thick, add a tiny bit more coconut oil. You want it to flow off the spoon in a smooth ribbon, not in heavy clumps.
Step 6: Attach the sticks
Take a few cake balls out of the fridge and keep the rest chilled. Dip about 1/2 inch of a lollipop stick into the melted coating. Insert the dipped end of the stick halfway into the center of a cake ball.
Repeat with the remaining cake balls. Chill the tray again for 10 to 15 minutes so the coating at the base of each stick sets and holds.
Step 7: Dip the cake pops
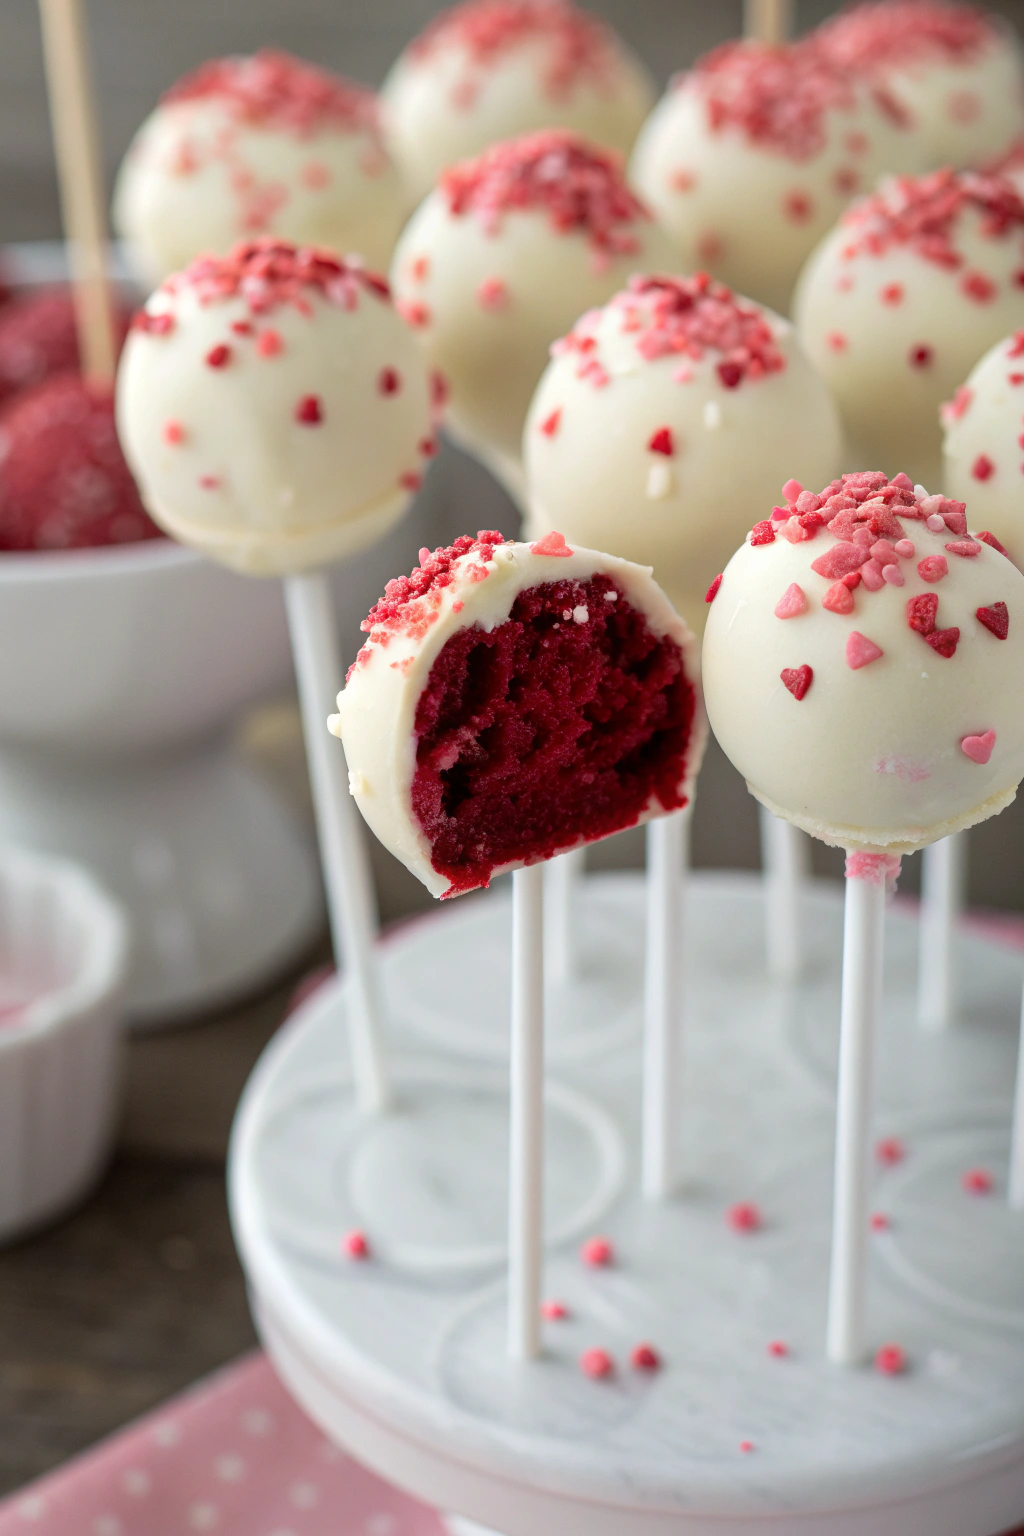
Work with 3 to 4 cake pops at a time and keep the rest in the fridge. Hold a cake pop by the stick and dip the entire ball straight down into the melted coating. Lift it out and gently tap the stick on the side of the bowl while you rotate the pop so the excess coating drips off evenly.
Hold the cake pop upside down for a few seconds to let the coating smooth out. If you see air bubbles, gently tap again until they pop.
Step 8: Decorate and set
While the coating still feels wet, add sprinkles, crumbs, or mini chocolate chips. Stick the finished cake pop upright into a Styrofoam block or stand so it can dry without flat spots. Repeat with the remaining cake pops, reheating the coating in short bursts if it thickens.
If you want a drizzle, let the base coat set first. Then melt a contrasting color, drizzle it with a spoon or piping bag, and let it set again.
Variations I’ve Tried
I sometimes mix mini chocolate chips into the cake and frosting mixture for a chocolate chip red velvet version. Kids love a cookies-and-cream twist, so I stir in crushed chocolate sandwich cookies and coat the pops in white candy melts. For a birthday vibe, I roll the dipped pops in rainbow sprinkles and use bright colored sticks.
You can also coat red velvet cake pops in dark chocolate for a richer flavor and top them with a tiny pinch of flaky salt. Around holidays, I use red and green sprinkles for December and pink and white for Valentine season. If you want a lighter sweetness, use more white coating and less frosting in the filling.
How to Serve Red Velvet Cake Pops
Serve red velvet cake pops at room temperature so the centers taste soft and moist and the shell feels crisp. Arrange them upright in a foam block, a cake pop stand, or even a jar filled with rice or sugar. They work for birthdays, baby showers, school parties, or just a fun dessert after dinner.
Pair them with milk, hot chocolate, coffee, or tea for a sweet treat that feels special without a full slice of cake. I often pack a few in lunch boxes as a surprise dessert.
How to store
- Store finished red velvet cake pops at room temperature in an airtight container for up to 2 days if your kitchen stays cool.
- For longer storage, keep them in the fridge for up to 5 days; let them sit at room temperature 15 to 20 minutes before serving.
- Freeze undipped cake balls on a baking sheet until firm, then transfer them to a freezer bag for up to 2 months.
- Thaw frozen cake balls in the fridge overnight before you dip them so they do not crack the coating.
- If you freeze finished dipped cake pops, wrap each one tightly, freeze up to 1 month, and thaw in the fridge; condensation may soften decorations slightly, so store them upright.
Red Velvet Cake Pops Recipe
Ingredients
Instructions
- Preheat the oven to 350°F (175°C). Grease and flour an 8-inch round cake pan or line it with parchment paper.
- In a medium bowl, whisk together the flour, sugar, cocoa powder, baking soda, and salt.
- In a separate bowl, whisk together the buttermilk, vegetable oil, eggs, vanilla, vinegar, and red gel food coloring until well combined.
- Add the wet ingredients to the dry ingredients and mix just until smooth and evenly colored.
- Pour the batter into the prepared pan and bake for 25–30 minutes, or until a toothpick inserted in the center comes out clean.
- Let the cake cool completely in the pan on a wire rack.
- In a medium bowl, beat the softened butter and cream cheese together until smooth and creamy.
- Gradually add the powdered sugar and beat until light and fluffy.
- Mix in the vanilla extract until fully incorporated.
- Once the cake is completely cool, crumble it into a large bowl, breaking it into fine crumbs with your hands.
- Add a few spoonfuls of cream cheese frosting to the cake crumbs and mix with your hands until the mixture holds together like a moist dough. Add more frosting as needed, but do not over-moisten.
- Roll the mixture into 1- to 1 1/4-inch balls and place them on a parchment-lined baking sheet.
- Chill the cake balls in the refrigerator for at least 1–2 hours, or freeze for 20–30 minutes, until firm.
- Melt the candy melts in a microwave-safe bowl in 20–30 second intervals, stirring between each, until smooth. Stir in the shortening if using to thin the coating.
- Dip the tip of each lollipop stick into the melted candy, then insert it halfway into a chilled cake ball. Let the coating set for a few minutes to secure the stick.
- Holding the stick, dip each cake pop into the melted candy, gently tapping off the excess and rotating to fully coat.
- While the coating is still wet, add sprinkles or colored sugar if desired.
- Place the coated cake pops upright in a styrofoam block or a box with holes to set completely at room temperature or in the refrigerator.
- Serve once the coating is firm. Store leftover cake pops in an airtight container in the refrigerator.
Notes
Approximate per 1 cake pop (about 1/24 of recipe): 160–190 calories; fat 9–11 g; saturated fat 5–6 g; carbohydrates 20–23 g; fiber 0–1 g; sugars 15–18 g; protein 2–3 g; sodium 120–170 mg. Values will vary based on exact ingredients, brands, and portion size.
Leave a Reply